The Forest - User Guide
Sections in this page
- The initial map
- The map colours & symbols
- The scene on the ground
- Roles
- Settings
- - The status line
- - Two windows
- - Optional URL parameters
- Explorers: games for you
- - Buildings
- - Extra buttons/keys
- - It's raining
- - Aerial views
- Orienteering: the courses
- - The easy short course
- - Analysis at the finish
- - The score event
- Course planning
- - Making a new course
- - Managing courses
- Engineering
- Plotting the terrain in 3D
- Latest changes & development
- - 20.3.28: Streams and paths
- Further information
- Links
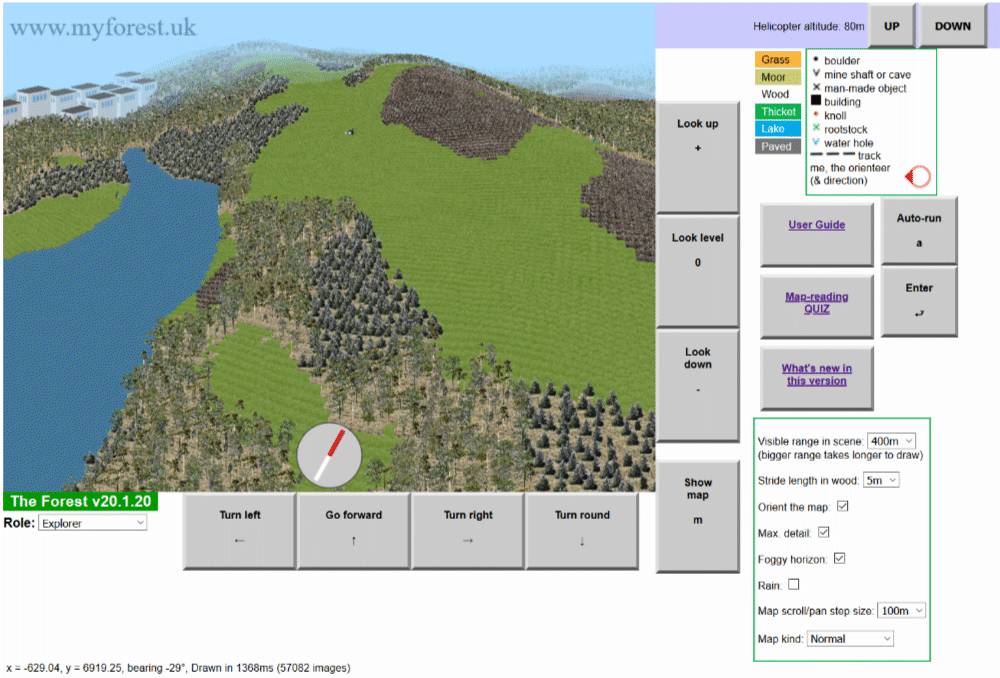
- View from a helicopter
A more up-to-date PDF version of this is here.
A major aim of The Forest, from its earliest version around 1982, has been to help people interpret the contour information in maps. That enables orienteers to navigate without just following roads or streams, it helps hill walkers to avoid getting lost, and more generally it helps anyone reading a map to get the most out of it.
This program includes some non-trivial games and diversions for those who are not orienteers; we will call them explorers, which relates to another version published in the 1980s.
The Forest also demonstrates a technique for generating vast terrain by an algorithm rather than by storing it in memory or having to download it as a huge amount of data. It is written in JavaScript for an HTML5 web page and the program occupies only about 200 kilobytes, so it downloads and runs very quickly. Nevertheless it has more than 1,000 sq km of forest to explore (very much more!).
Try it: The Forest (myforest.uk)
GETTING STARTED
When The Forest has loaded you will see that there are buttons around the map in the main display area. The buttons are large to help those using tablets or phones with touch-screens but no keyboard. The buttons often indicate keyboard alternatives (for those who do have keyboards): either tap/click the button or press the key. Hovering over a button will sometimes show alternative keys that may also be used. Here is an example:

This button shows that when it is tapped/clicked you will move forward on the ground. It also shows that if you have a keyboard you could instead type the upward arrow key, [↑]. The example was captured when a mouse was hovering over the button and that shows that another possibility is to type the [f] key. Not all buttons have keyboard alternatives.
There is another alternative to using any of the buttons which show an arrow key: instead tap or click just inside the corresponding edge of the map or scene display area. The top edge moves you forward in the scene or moves north on the map, and so on.
Occasionally explorers will find it relevant to use the [Enter] key and for those without keyboards the same effect is obtained by tapping/clicking the centre of the map/scene display area. Sometimes also it is useful to tap/click on an object in the scene. It should become apparent when these actions are needed.

The initial map
When The Forest starts it shows a tiny portion of the map on which your position is marked with a red circle. The red circle is slightly pointed to indicate the direction in which you are facing. Initially you will be looking almost due south. The dashed red circle indicates how far you will be able to see around you on the ground, a distance of 60 metres when you start.

The map colours & symbols

To the right at the top of the map is a key for understanding map colours and symbols. These are designed to be the same as are used internationally on maps for the sport of orienteering. It may seem surprising to some that the white areas are wooded. This is because open woodland (open rather than thicket) is the most ideal terrain for orienteering. It is reasonably fast to move through but you cannot see long distances.
Notice that every fifth contour on the map is thicker than the others. This is normal on orienteering maps. If you study the map you will see that this thickening helps to interpret whether some contours are up or down from neighbouring ones. (Orienteering maps also use downward-pointing tags on some contours to help further. There does not seem to be a way of doing this automatically and reliably by programming.)
Scale is given by the fact that the black north lines are 300m apart. 1 pixel in the display represents 1 metre on the ground. Actual size depends on the size of your display screen.
The scene on the ground

The first thing you might want to do is tap/click the button at the bottom right corner of the map (or, as it suggests, type the [s] key) to view the scene from your position:
The scene view (below) indicates what you would see from an eye level 1.5m above the ground. The view indicates whether the ground ahead slopes up or down, according to the contours on the map. The type of terrain ahead is indicated by graphics. Real photographic images are used rather than simple drawn graphics. The ground is drawn in true perspective out to a certain distance ahead (the visible range). Initially this range is set to 60m but you can select greater ranges. See the Settings section for how to do this.

Switch back and forth between the scene and map to see how each corresponds to the other. If you have a keyboard you will find that you can keep pressing either one of the [m] or [s] keys to switch between map and scene.
Notice how the buttons change depending on whether you are viewing the map or the scene.
Next try turning from side to side and right round, so you understand how the scene changes and it still corresponds to the map. Take note of what the compass is showing, at the bottom of the scene (the red end points to north) and how that relates to your orientation as shown on the map. Left and right turns change your bearing by 15 degrees.
Then move forward in the scene. You will find that when you switch to the map you will remain in the centre of it wherever you have moved to.
It is possible to orient the map so that whatever your compass bearing is, the direction ahead of you will be straight upwards on the map. See the Settings section for how to do this.
On each step forward the bearing drifts by a random amount, up to 5 degrees to either side. In real life you would not be able to follow a set bearing precisely. However, this drift does not occur if standing on a paved area because paths (between buildings) are easier to follow.
Roles
When The Forest starts your role is that of Explorer. By all means stay in this role if you just want to explore and discover that there is a treasure hunt with map fragments, coded clues, and many other things to investigate. There is more about this later: see Explorers: games for you.

However, below the title of The Forest, under the left side of the main display area, is a drop-down list of other possible roles you could choose.
-
Explorer. In this role your position is always shown on the map by a symbol indicating the current orientation (bearing). There is no orienteering course, the terrain may be explored without limit. The map can be scrolled and panned and there is a button for centring the map on the observer (referred to as "me" on the button). The current coordinates of the centre of the map are shown in a status line at the bottom. Warning: Explorers can fall down mineshafts if they get too close. (Fortunately orienteers are immune to this potential hazard.) The author has discovered by exploring for himself that some mineshafts are connected to others by the underground mine passages. The display of these passages does show whether there is a mineshaft above. There will also be a ladder and it is possible to escape up it.
More: see Explorers: games for you. -
Orienteer. Selecting this role will enable a course to be selected from another drop-down list. The orienteer's current position will NOT be shown on the map, unlike the novice role (below). The selected course then appears on the map and a control card can be viewed. The orienteer is positioned at the start of the course, facing roughly the right direction. A timer starts, shown below the map or scene. Orienteering marker flags do not appear only at the features marked on the course; a quarter of other features will also show markers (apparently randomly selected). Getting within 5 metres of the next control causes the control card to appear, showing the control as punched. Controls will only be punched if they are visited in the correct order. On reaching the finish banner with a complete set of punches the clock is stopped and a full card now also shows the time taken and the actual distance covered. A table is then shown at the bottom of the page, analysing the route in terms of the distance covered and the time taken for each leg (yes, the speed is fantastic but it is possible take strides of up to 5m).
More: see Orienteers: the courses. -
Orienteer (novice). This is almost identical to the previous role except that the orienteer's current position is always shown on the map, making the course much easier. It is possible to first try a course this way and then compare without the position marker (or vice versa). In real life you would not get your position marked on the map of course but this option may be useful for training purposes.
More: see Orienteers: the courses. -
Orienteer (expert). This is almost identical again. The difference this time is that the forest contains no thickets or open areas. The terrain is all runnable woodland apart from the lakes. The map looks simpler but this makes navigation more difficult. It is necessary to make more use of the contours.
More: see Orienteers: the courses. -
Course planner. This observer is able to see markers with their codes and coordinates at every point feature, to enable choices for making a course. It is possible to create whole new courses. In most browsers the new courses will be saved and be available in subsequent sessions (using HTML5 local storage on the user's machine, not on the server).
Note that the marker codes are generated as part of the terrain, they cannot be chosen by the planner. Controls within 26m of each other are guaranteed to have different codes (the condition for codes to be the same on 2 neighbouring features would be an exact spacing of 26m and oriented exactly due north/south or east/west of each other, which is very unlikely).
More: see Course planning. -
Engineer. This role is new in 2021. Engineers can build roads and bridges. These new features can optionally be saved (locally, in your browser) to reappear in subsequent runs of the program. Roads and bridges are only visible to explorers and engineers, either on the map or in the ground scene. They are not available as shortcuts for orienteers. Like orienteers, engineers are safe from falling down mineshafts.
More: see Engineering.
Settings
This box appears to the right of the screen. It contains various optional adjustments that affect the map and scene and your movement.

- Visible range in scene The horizon distance can be increased by selecting from this drop-down list. Orienteers will not need to do this but explorers may want to see further. This may make scene drawing too slow, depending on how fast your computer/phone is.
-
Stride length in wood The distance moved in one forward step can be altered. Initially it is set to 3 metres because it was thought that otherwise beginners might find the pace too slow. However, orienteers wanting more realism might want to reduce the stride to 1 or perhaps 2 metres.
That setting is for open woodland or grass. In other types of terrain it is not possible to move as quickly. On moorland or in a town the stride is halved. In a lake or a thicket it is divided by 4. So in a given time you can travel 4 times further in open woodland or on grass than you can in a thicket or wading through a lake.
On land these distances are also multiplied by a factor depending on the steepness of the ground ahead. A steepness factor can be seen in the status data below the scene view, as long as your role is not that of an orienteer (it might give too much help to orienteers). On the steepest upward slopes the step-distance is multiplied by 0.1. On level ground that rises to 1.0. On a slight downward slope it rises further to 1.2 but then on the steepest descents it goes down to 0.2. - Orient the map When this box is ticked it ensures that whenever you switch to the map display it will be orientated in such a way that the direction you were facing in the scene is straight upwards on the map. This does help many people to relate the map to the ground ahead.
- Foggy horizon ensures that objects beyond the horizon range do not suddenly pop into existence as they are approached. Instead they emerge gradually from a hazy horizon. This is perhaps more realistic and is therefore recommended if your processor is fast enough.
- Rain darkens the sky and produces light streaks across the scene. More importantly it causes lake levels to rise, altering the map, so you will not want to use this in an orienteering role. Lake levels gradually fall back to normal when the rain is switched off. A message confirms when the original levels are restored.
- Map scroll/pan step size determines by how many metres the map moves when you pan or scroll. Select from a drop-down list.
- Map kind This lets you switch off certain elements of the map. There a few options on a drop-down list.
For the experimental settings see below.
The status line
Below the map or scene, near the bottom of the HTML page, there is a status line which is rewritten every time the display changes. An example when a scene is displayed looks like this:
x = 15233.55, y = 5755.24, bearing 156°, steepness = 13, Drawn in 309ms (7309 images)
- x and y are the Cartesian coordinates of the observer's position in the terrain (x eastwards, y northwards);
- the bearing is the direction in which the observer is facing (clockwise from north);
- steepness is a measure of the difference between the height of the ground 10m ahead and where the observer stands, 0 being level and positive or negative values indicating upward or downward slope ahead;
- we then see how long it took to draw the scene, in milliseconds, and how many images (each suitably scaled) had to be drawn to assemble the whole scene; for programmers: this is a count of the number of calls to drawImage() in the standard 2D graphics context.
You may be interested to watch how the number of images and the time taken change as the visible range is altered via the drop-down control. They should go in proportion to the square of the range.
The status line is simpler when a map is shown, just giving x and y for the centre of the map and the time it took to draw.
If you make a note of them you can use the x and y coordinates to get back to any place in The Forest (but not if your role is orienteer, on a course).
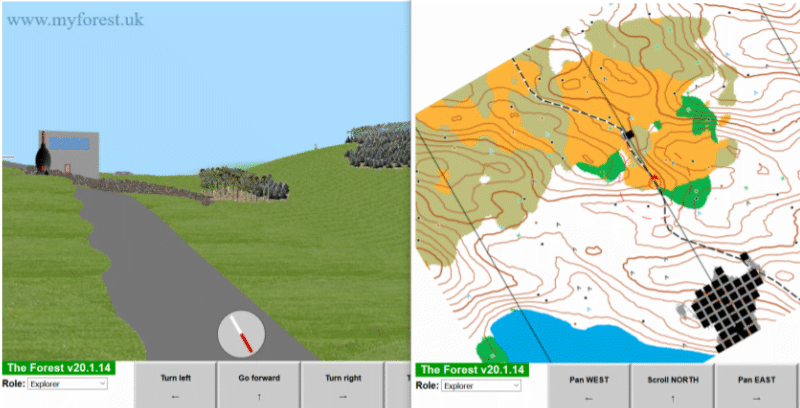
Two windows
On a PC (but not on a tablet or phone) you may well have room on the screen for part of the map alongside the scene on the ground. This can be achieved by having two browser windows open, each with a copy of the program running in it:
Optional URL parameters
It is possible to control some of the settings when The Forest first starts, by adding optional parameters to the URL (its internet address). This is done by appending a question mark (?) to myforest.uk followed by a number of "name=value" pairs separated by ampersands (&). For example,
myforest.uk?detail=y&r=150
This example would tick the "Max detail"check-box and set the visible range to 150m.
The full list of possible parameters follows.
- orient=y ticks the check-box for orienting the map.
- detail=y ticks the check-box for maximum detail in a scene.
- fog=y ticks the check-box for making the horizon foggy.
- rain=y ticks the check-box for making it rain.
- r=100 sets the visible range to 100 metres. Use a value on the range drop-down.
- s=2 sets the stride length in wood to 2 metres. Use a value on the stride drop-down.
- x=12345 sets the starting x position.
- y=6789 sets the starting y position.
- b=90 sets the initial bearing.
Explorers: games for you
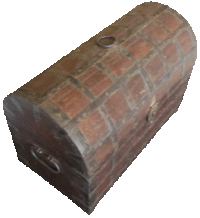
Explorers can see things in the forest which orienteers cannot (orienteers are not to be distracted). Some of these things will suggest a target to aim for (more achievable than in my 1980s Explorer version of this program: see Pixelatron). There is a treasure hunt which goes through several stages (game developers call them levels). There really is a treasure chest and many clues about where to find it.
Where orienteers would see a traffic cone, not marked on the map because it is potentially movable, explorers will find something else. Out in the open cones are replaced by aircraft that may be boarded to get aerial views. In woodland there are instead posters with writing on giving some clues for finding treasure. The clues are written in a code which the explorer will have to decipher. (This vocalian code was devised many years ago by Kevin Cook when we were school friends.)
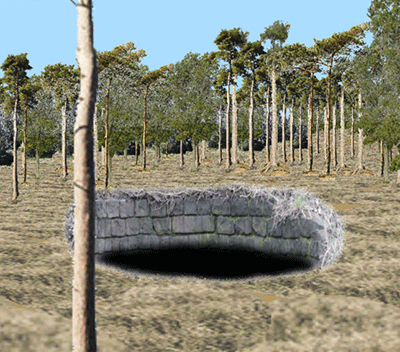
Also, explorers will fall down mine shafts if they get too close (orienteers are immune to this). There is an underground level to explore and it is possible to get back out again because there are some ladders. This is akin to dungeons in other games. There are things to find which can be useful in pursuing the treasure hunt.
NB: For explorers in certain situations the Enter key is significant (or on touch screens tap near the centre of the scene).
You will inevitably want to copy and save images of some of the things you see but this program does not provide any such facility. Instead you will need to use a screen copying program in whichever system you are running, such as the Snipping Tool in Windows.
Hint: there is a short-cut, described in this page, for something which may at first seem very lengthy in your task.
Hint: the target locations are within the first 32km block of the forest (the status line will show coordinates lying in these ranges: 0 < x < 32768 and 0 < y < 32768).
There are also several examples of a green door in a wall, to be entered to see a completely different view. Once again, there is a way back to the normal world but it may be difficult to work out.
Buildings
There are buildings occupying definite 3-dimensional spaces rather than being merely flat photos. These are more of an obstacle to orienteers because it is not possible to just run across their patch of ground. Instead it is necessary to steer a path along the 4-metre-wide alleyways between the buildings.
The buildings are arranged in a regular grid arranged exactly north-south and east-west. They are shown on the map as black squares on a grey background indicating the paved area on which they stand.

There is a door on every building but it may not be on a visible side. The doors are all different colours and have different key codes. It is possible to enter any building if you know the key code specific to its door. There are clues to help you determine the key codes. This will not be of any interest to orienteers but explorers following the treasure hunt will find the clues. There are things to find inside buildings and it is necessary to get inside a particular building before a certain stage of the treasure hunt becomes possible.
Extra buttons/keys
Explorers can use some other keys to achieve certain effects. For those without keyboards there are some buttons shown to the right of the screen to tap/click instead.
When the map is displayed:
- Jump - key [j] puts you on the ground at the centre of the current map display, as long as that is not on a town.
When the scene is displayed:
- Auto-run - key [a] starts moving forward repeatedly at 1-second intervals. The current stride length and imprecise bearings are used. This should continue indefinitely until another key is pressed or you show the map instead. It is possible to steer while the automation runs.
- Enter - key [Enter] may have a use at certain points in your exploration. It is for you to discover the circumstances.
It's raining
Something else which explorers can experience (but orienteers will not want to be bothered with) is changing weather. Rain causes the levels of lakes to rise. When it stops and the sun comes out, the levels fall back. A message appears briefly when lake levels are back to normal. This illustrates that the terrain can change. Earthquakes would change the topography more drastically and that could easily be programmed but it has not been done (yet).
Aerial views
Where orienteers might see a traffic cone on open ground, those in the role of explorer will instead see a helicopter. When within 7m it is possible to board the helicopter and ascend to view the terrain from above. This gives a new perspective in more than one sense: by switching between scene and map it is then possible to get a different idea of the relationship between contours on the map and the relief of the terrain. It may be useful for orienteers to try this.
The helicopter can only land (reduce altitude to 0) on open ground. It remains where it lands and may be used again.
An example of an aerial view can be seen at the bottom of this page.
Interestingly (to programmers and mathematicians) the aerial view reveals patterns in the planting of trees, patterns which are not apparent at ground level. This is particularly the case for thickets because the tree images there are more similar to each other than in the mature wood. The patterns are reminiscent of those arising in cellular automata and will be a property of the algorithm used for positioning the trees, based on binary digits of multiples of pi.
Orienteering: the courses
If you are not familiar with the sport of orienteering you may like to read this: British Orienteering Newcomer's Guide
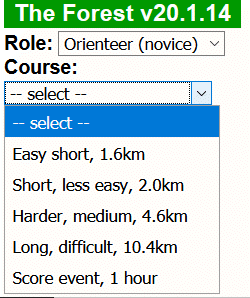
When you choose one of the 3 possible orienteering roles (novice, average, expert) in The Forest you will be prompted to select which course to run, from a drop-down list:
The easy short course

Notice the digital clock at bottom left which starts as soon as a course has been selected. You will be positioned just in front of the start, which is in the centre of the purple triangle symbol. When you switch to the scene you will see the start banner and you will be facing roughly in the direction of the first control point. Control points are at the centres of the numbered circles and they must be visited in ascending numerical order. The Forest program does not allow them to be taken out of order. The course ends at the double circle shown on the map, where there is a finish banner.

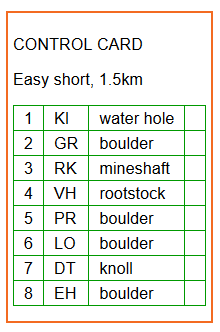
Control points have orange and white markers like this bearing a 2-letter code. You can check the code against a control card which appears to the right of the map/scene display. The card shows a description of the control, in this case a boulder, and whether you have visited it. This is the second control on the easy short course. The map shows how it lies on the edge of a wooded area with moorland beyond.
Analysis at the finish
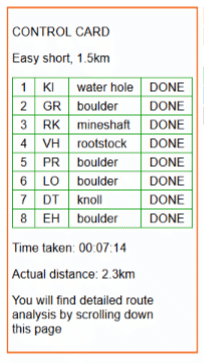
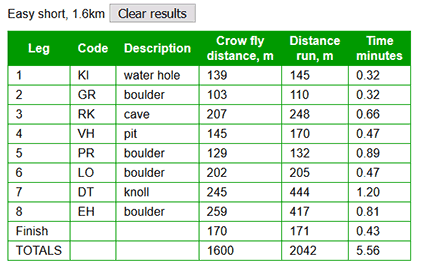
When an orienteer completes a course the full control card and a table analysing the route are shown:
There is also a button above the results table for causing the actual route taken to be plotted on the map. This also means that automatic reversion to the role of Explorer does not occur until the results are cleared.
It is possible to abandon a course part way round and still see the analysis for the portion completed.
How is it that the orienteer can sometimes complete a leg of the course by travelling less than the crow-fly distance? Easily because it is only necessary to be within 5m of a control for it to be punched. By approaching and leaving controls in the right direction it is possible to cover up to 10m less than the actual distance between controls. This is not just a feature of this simulation: it now happens in the real sport because electronic devices are used for automatic punching when within 5m of a control.
The score event

This is part of the map for the start of the score event. As for other courses, the purple triangle is the starting position and the double circle is the finish. The numbers alongside the control circles are points which can be scored by visiting the controls (by getting within 5m). Scores are proportional to the distance of the controls from the finish point. You can choose which controls to visit, in any order. Once a control has been visited it cannot be used again.
There is a time limit. You must reach the finish within 1 hour. Otherwise there is a penalty to be deducted from your score, based on the number of seconds you are over the hour.
Course planning
As well as the permanent courses supplied with The Forest, orienteers can make their own. Furthermore there is a facility for such courses to be sent to others to plug into their copies of The Forest. These courses are held within each user's own browser; nothing is sent to the server.
The point is that a team trainer can plan courses and send them to team members to try on their own machines.
On selecting the role of course planner, two buttons appear: either a new course can begin to be planned or a new web page can be opened for managing the available courses.
Making a new course
The first button, to begin a new course, further changes the page to provide other buttons, which remain visible whether the map or the scene is being viewed.

The options are as follows. The map is redrawn with course symbols as the course is built up.
- Put start here - likely to be used first, to place the start triangle at the observer's current position. The start can be moved simply by using this button again at some stage during the course construction.
- Use nearest feature - creates a control on the course at the point feature nearest to where the observer is standing. A control card showing descriptions and codes so far is then displayed.
- Put finish here - similar to positioning the start. You cannot place start and finish closer than 30m and a message appears to tell you that if it is attempted.
- Delete last control - undoes the last control addition. This can be repeated to go back as far as necessary.
- Finalise and save course - first asks for a title for the course, to be shown in the list for orienteers to select courses. Then the course is saved along with any other of your own planned courses, in the browser's local storage.
You would then change to another role to complete the course planning process.
Managing courses
This button takes you to a new web page that lists existing courses and allows several things to be done with them.

The first few courses listed are the fixed ones that are supplied as part of The Forest. Then your own courses are listed. There are 3 possible actions for these lower rows of the table:
- Delete - asks for confirmation before deleting the chosen course.
- Show data - displays the whole of the data of the course in a box below the table. The data are in a format called JSON, which stands for JavaScript Object Notation. This format is for transferring data between systems simply as text. The box displayed for this action, outlined in green (see figure below), allows its contents to be selected and copied. Make sure you copy the whole text, or the recipient will not be able to use it.
- Paste course data - the other half of the data transfer. If you have received course data in JSON format, select it and copy it and then paste it into the box displayed for this action. Then there are buttons either to continue or to cancel the action.

Engineering

When in the role of Engineer, displaying the map, clicking anywhere on the map causes this menu to appear over the top left corner of the map. It should be self-explanatory. As you click on further points and extend the road it appears on the map.
It is important to note that the road will not appear in a ground scene until the "End road here" button has been used. That button also leads to a choice as to whether to save the new road so it appears in subsequent runs of the program. The data are only saved locally in your browser.
If a road crosses a lake, which is perfectly permissible, it will appear in scenes as a crude form of bridge, just supported by wooden posts.
You, the engineer, should be positioned in the visible part of the map when clicking points for new roads because otherwise clicking one of the buttons in the menu (except the first and last ones, start and cancel) will cause the map to redrawn, centred on you.
It can be amusing and educational to try linking towns by roads that tend to use the contours rather than going straight up or down steep hills. Then go along the roads on the ground to see how that has worked.
Plotting the terrain in 3D
This is a weak feature of the program and it may disappear in later versions.
The aim of the 3D plot is to help people interpret contour lines on the map. It may take several seconds to draw the plot - rather longer than the scene or map views.

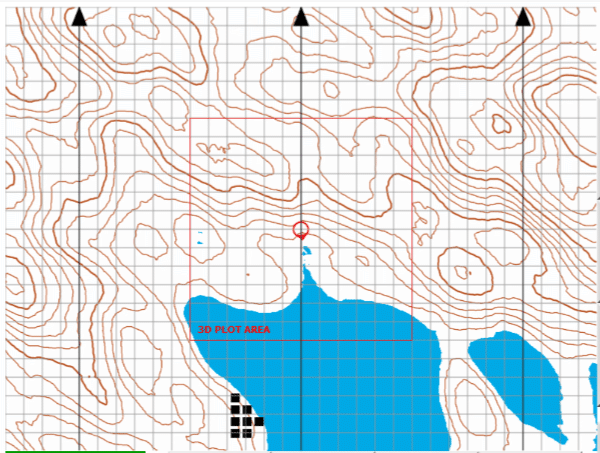
The following is a version of the map showing the area of a 3D plot. This can be seen by selecting this map kind in the settings.
Latest changes & development
Recent and planned changes are summarised on the "What's new" page. I am open to ideas for further enhancements.
20.3.28: Streams and paths
There are two new kinds of features in the terrain. They are both experimental, so users may choose whether to switch them on, by ticking boxes in a new "experimental" section at the bottom of the settings area.
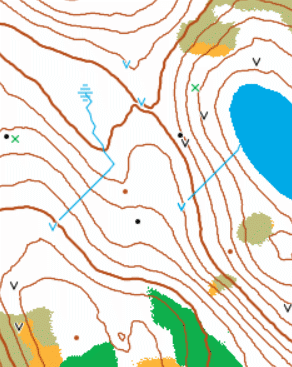
Streams
Some water holes (ponds) have streams flowing downhill from them. Some end in lakes, others in marshy areas.
These streams often help with contour interpretation: is a contour uphill or downhill from its neighbours? They may therefore be a useful educational tool.
The streams have a tendency to run on 45° bearings and you may think they tend to be too straight. In real forests drainage ditches are often dug like this.
The longest streams I have found so far are about 400m long.
The representation of streams in the scene view is very basic and will need improving; it does not yet indicate when you are standing in a marsh.
The streams also have some undesirable properties, which is why they are still experimental:
- They are only drawn on the map when the source waterhole is on the visible map area.
- They are only visible in the scene view if they have previously been seen on the map. This is likely to be the case unless you use the automatic run through the forest.
The previous Water (key w) button, to make a stream from the observer's position, has been removed.

Paths
These are less successful than the streams but they represent a major breakthrough in the programmatic generation of the terrain because it was previously thought impossible to do this automatically.
Paths are shown on the map as grey lines of varying width, sometimes with blobby areas. In the scene they appear as rather badly placed paving. It is extremely difficult to see how they could be converted automatically to conventional dashed lines on the map and so paths must also remain experimental.
Further information
There are some pages about my orienteering maps of real forests here. Follow the links there to read more about the maps for the original ZX Spectrum simulation of orienteering.
In particular there is a page about why The Forest is designed the way it is, which I wrote in the mid-1980s. It still has some relevance, especially about why I do not attempt to use maps of real forests (a scarce resource in the UK).
I started developing the new HTML5/JavaScript version in 2014 but it was heading more towards my second Spectrum program, Explorer (published by Electric Dreams in the mid-1980s). The new version included the possibility of falling down mineshafts and navigating underground. It also included a teleportation feature whereby typing a string of characters would take you to a new position on the map, seemingly at random but the same string would always go to the same place. Having got those features to work I shelved the project for a while.
My interest began again in February 2018 with an email out of the blue from Graham Scott of NATO (Newcastle and Tyneside Orienteers). He and I had been members of Tyneside Orienteers (as it was then) more than 30 years ago. I decided to complete the program as a purely orienteering project but it soon developed into much more than that.
Links
Try The Forest: myforest.uk
Detailed history of The Forest (the next page here).
A 1984 review of the original version, in Crash magazine.
A programmer's guide to The Forest is also being written.
If you wish to learn to program you could do worse than follow my JavaScript course, based on training I used to give professionally.
British Orienteering Newcomer's Guide
Better Orienteering - a site containing a huge number of references and links to useful orienteering resources.
Food for thought: Philosophy of The Forest
View from a helicopter
Finally, here is an example of what can be seen as an explorer if you find a helicopter, go up in it and fly around for a while. Notice how the helicopter controls appear, top right.